A freestanding tub is a significant investment in your home’s value and your personal comfort. To protect that investment, the installation has to be perfect. A poorly executed job can lead to thousands of dollars in water damage, ruining your new floors and the subfloor below. It’s a project where precision is non-negotiable. From ensuring the floor joists are properly reinforced to creating watertight plumbing seals that will last for years, every detail matters. This step-by-step guide covers the entire freestanding tub installation process, highlighting the common pitfalls and how to avoid them. We’ll show you how a professional approach ensures your bathroom remodel is built to last.
Key Takeaways
- Plan Your Placement and Support: Before you begin, confirm your floor can handle the tub’s weight when full and perform a dry-fit to finalize its position, ensuring proper drain alignment and enough space for cleaning.
- Level the Tub and Secure Connections Carefully: Use the tub’s adjustable feet and shims to create a perfectly stable base, and tighten all plumbing connections until they are snug, not overtightened, to prevent damaging the seals.
- Verify Your Work with a Water Test: The most important final step is to fill the tub completely and check every connection for drips before applying a silicone sealant around the base for a clean, waterproof finish.
Before You Start: What You’ll Need
A successful freestanding tub installation starts long before the tub even enters the room. Just like a chef preps their ingredients, getting your tools and materials organized is the secret to a smooth, stress-free project. Taking the time to prepare now prevents frustrating mid-installation hardware store runs and ensures you have everything you need to do the job right.
This is also the perfect time to double-check your game plan. A beautiful tub in the wrong spot or on an unsupported floor can create major headaches down the line. Let’s walk through exactly what you’ll need to gather and verify before you get started. For homeowners in San Diego, our team handles every one of these details as part of our seamless bathroom remodeling process, ensuring a flawless result without the guesswork.
Your Tool Checklist
First, let’s gather your tools. Having these items within arm’s reach will make each step of the installation much easier. You don’t want to be searching for a level while trying to hold a heavy drain pipe in place. Most of these are standard tools you may already have, but it’s always best to check your toolbox and make sure everything is accounted for.
Here’s what you’ll want to have ready:
- Pencil
- Measuring tape
- Level
- Silicone and caulk gun
- Drill with a hole saw bit
- Adjustable wrench
Materials and Parts List
Next up are the materials and parts. This list includes everything from the drain components to the items needed to protect your floors and the tub itself during installation. We recommend laying everything out on a protective blanket or a piece of cardboard to keep it organized and prevent any scratches. Having all your parts ready ensures you can create secure, watertight seals without any interruptions.
Your shopping list should include:
- Plumber’s putty or silicone
- Drain assembly (tailpiece, nut, and bushing)
- Protective blanket or cardboard
- Adhesive or caulk for securing the tub base
- A few clean, damp cloths for cleanup
Measure Your Space and Check Floor Support
This is arguably the most critical preparation step. Before you even think about moving the tub, you need to confirm your bathroom can accommodate it. Use painter’s tape to outline the tub’s footprint on the floor. This helps you visualize how it will fit and ensures you leave enough clearance. Plan for at least four inches between the tub and the wall for easy cleaning, and about six inches on the faucet side for future plumbing access.
More importantly, you must verify your floor can handle the weight. A cast iron tub filled with water can weigh over 800 pounds. Your floor needs to be perfectly level and structurally sound to prevent sagging or cracking. This is one area where professional expertise is invaluable; our design-build team always assesses the existing structure to ensure your new tub has the solid foundation it needs.
How to Prep Your Bathroom for Installation
Before you even think about bringing that beautiful new tub into the room, a little prep work will save you a lot of headaches. Getting the foundation right is the most important part of the entire installation. It ensures your tub is safe, stable, and functions perfectly for years to come. Think of it as setting the stage for your bathroom’s new centerpiece. A successful bathroom remodeling project is all about the details, and these foundational steps are where precision matters most. From making sure the floor can handle the weight to getting the plumbing just right, this initial phase prevents costly mistakes and ensures a flawless finish. Taking the time to properly check your floor support, drain placement, and levelness will make the rest of the process go smoothly and give you peace of mind. It’s the difference between a tub that feels solid and secure and one that causes problems down the line. We’ll walk through exactly what you need to do to get your space ready.
Confirm Your Floor Can Support the Weight
A freestanding tub is heavier than it looks, especially when filled with water and a person. We’re talking about a potential weight of 600 to 800 pounds. Your floor needs to be strong enough to handle that load without sagging or shifting. This is especially critical in older San Diego homes, where the original floor joists might not have been designed for this kind of weight. If there’s any doubt, it’s always best to have a professional assess the structure and add reinforcement if needed. This isn’t just about preventing a wobbly tub; it’s a crucial safety step to protect your home’s integrity.
Make Sure Your Drain Is in the Right Place
Proper plumbing alignment is non-negotiable for a leak-free installation. Before you apply any sealant, you’ll want to do a “dry fit” by placing the tub exactly where it will go. This allows you to check that the tub’s drain lines up perfectly with the waste pipe in your floor. Once you’ve confirmed the position, carefully mark the tub’s outline on the floor with a pencil. This gives you a clear guide for the final placement and ensures all the plumbing connections will meet without stress or strain. Getting this right from the start prevents major plumbing issues down the road.
Create a Perfectly Level Foundation
For your tub to be stable, the floor beneath it must be perfectly level. Even a slight slope can cause the tub to rock, which is both annoying and unsafe. The industry standard is a tolerance of no more than 1/8 of an inch over the footprint of the tub. If your floor isn’t quite flat, you can use thin, flat shims under the tub’s feet to correct any inconsistencies. A level foundation ensures water drains correctly and prevents stress on the tub and plumbing connections. This attention to detail is a key part of our process and makes all the difference in the final result.
Where Should Your Freestanding Tub Go?
Choosing the perfect spot for your freestanding tub is one of the most exciting parts of a bathroom remodel. Unlike a standard alcove tub, a freestanding model isn’t confined to three walls, giving you incredible design freedom. But with that freedom comes a big question: where should it actually go? The right placement isn’t just about connecting the plumbing; it’s about creating a beautiful focal point, ensuring the room feels balanced, and making sure the tub is practical for daily use.
Before you get attached to a specific location, you need to consider the room’s overall layout, traffic flow, and how much space you truly have. A tub that looks stunning in a photo can easily overwhelm a smaller bathroom if it’s not placed thoughtfully. The goal is to find a spot that feels both intentional and functional. During our design process, we use 3D renderings to help you visualize exactly how the tub will look and feel in your space, taking the guesswork out of it. Let’s walk through the key things to consider to find that perfect home for your new tub.
Pick a Spot That Fits Your Bathroom’s Style
The location of your tub sets the tone for the entire room. Do you want it to be a dramatic centerpiece or a quiet retreat? If you have a large primary bathroom, placing the tub under a window or centered on a wall can create a stunning focal point. For this to work, your bathroom needs enough square footage to accommodate the tub with grace, so it doesn’t feel like it’s just floating in the middle of the room.
If your space is more modest, setting the tub against a feature wall can be just as impactful. An oval or rectangular tub placed along a wall can highlight the room’s length and still feel open and luxurious. This also gives you a great opportunity to showcase beautiful tilework behind it.
Leave Plenty of Clearance Around the Tub
Functionality is just as important as style. You need to leave enough room around your freestanding tub to make it easy to use and clean. We recommend leaving at least four to six inches of space on all sides. This clearance ensures you can easily get a mop or vacuum around the entire base, preventing dust from collecting in hard-to-reach spots.
This buffer zone also gives you comfortable standing room to get in and out of the tub without feeling squeezed against a wall or vanity. Plus, it provides the necessary space for your plumber to install the faucet and drain without any issues. A little breathing room makes a huge difference in how spacious and functional your bathroom feels.
Use a Template for Accurate Placement
Before you finalize the tub’s location and have your plumber rough in the drain, it’s a great idea to use a template. Most manufacturers provide a paper or cardboard cutout that matches the footprint of your tub. You can lay this template on the floor and move it around to test different spots.
This simple step helps you visualize exactly how much floor space the tub will occupy and confirms you have enough clearance for walkways. It allows you to see how the placement works with your vanity, toilet, and door swing. Seeing a life-size outline in the room is often the best way to feel confident in your decision before anything becomes permanent. It’s a key step we take with clients in our showroom to ensure the final layout is perfect.
Your Step-by-Step Installation Guide
With your bathroom prepped and ready, it’s time for the main event. Installing a freestanding tub requires precision, but breaking it down into these four key steps makes the process much more manageable. Follow along to ensure every connection is secure and your beautiful new tub is perfectly placed.
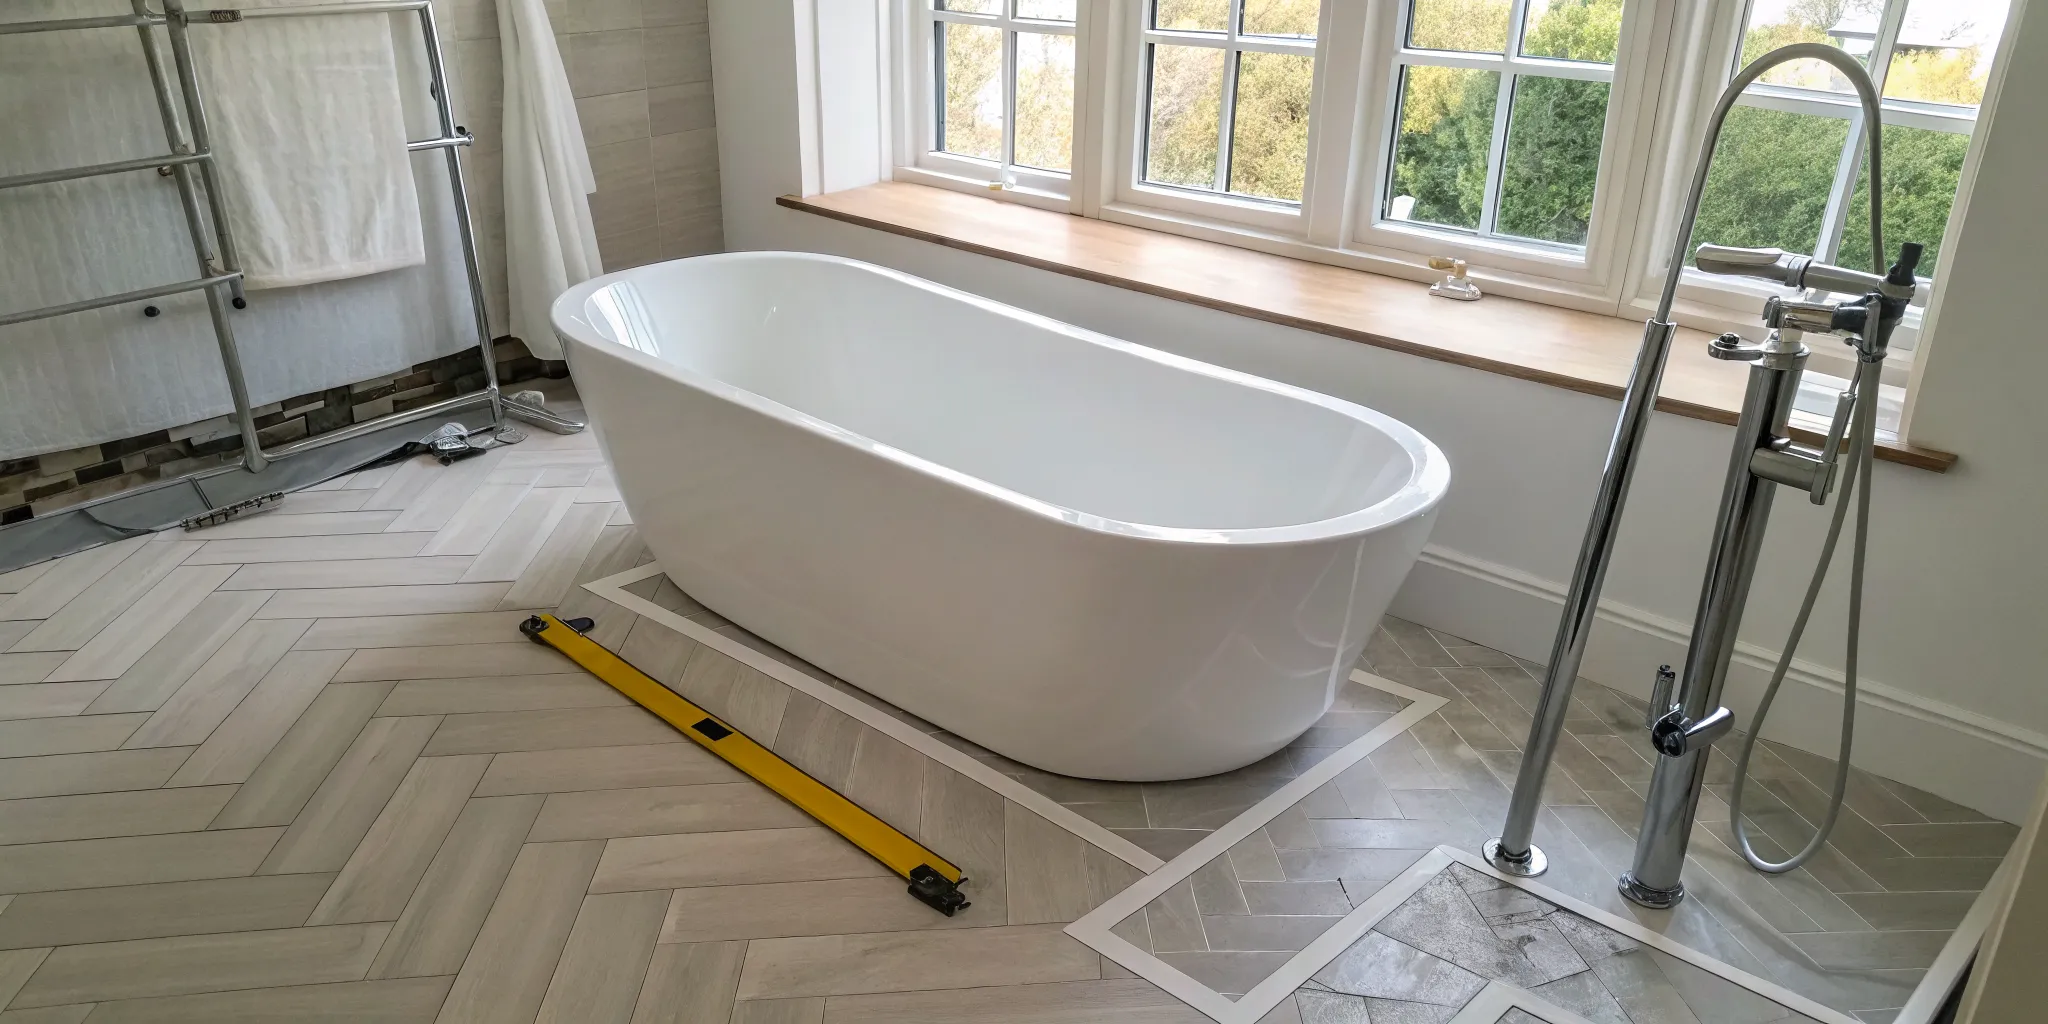
Step 1: Dry-Fit the Tub
Before you connect a single pipe, you need to do a dry-fit. This is a non-negotiable step that saves you from major headaches later. Carefully place the tub exactly where you want it to live permanently. Check that the tub’s drain lines up perfectly with the drainpipe coming out of your floor. Once you’re happy with the position, use painter’s tape or a pencil to trace the base of the tub on the floor. This outline will be your guide for the final placement. This simple action ensures everything aligns before you start working with sealants and permanent connections, preventing any last-minute surprises.
Step 2: Connect the Drain Assembly
Now, gently move the tub aside so you can access the floor drain. It’s time to connect the drain assembly. We always recommend using the specific drain kit that came with your tub, as using a different one can sometimes void the warranty. Following the manufacturer’s instructions, connect the tailpiece to the P-trap. Start by hand-tightening all the components to avoid cross-threading, then give them a final turn with a wrench for a snug fit. If you find a slight misalignment between your pipes, a flexible connector can be a real lifesaver.
Step 3: Secure the Plumbing Connections
With the drain assembly in place, the next step is to lock everything in. Securing the tub to the floor is what protects the drain connection from shifting or straining as you use it. Apply a continuous bead of 100% silicone sealant on the floor, staying just inside the outline you traced earlier. Carefully move the tub back into position, lowering it directly onto the sealant and aligning its drain with the floor pipe. Press down firmly to create a solid bond. Some tubs also come with mounting brackets for extra security; if yours has them, screw them into the floor now. This ensures your tub stays put, protecting the plumbing underneath.
Step 4: Install the Faucet and Water Lines
The final step is installing the faucet and connecting the water. Whether you have a floor-mounted or deck-mounted tub filler, the process requires careful attention. For faucets installed on the tub itself, place masking tape over the drill area to protect the finish from chipping, then carefully drill the holes. Once the faucet is mounted, connect the hot and cold water lines. After everything is connected, turn the water supply on slowly and check every single connection point for leaks. This is a critical part of any bathroom remodeling project, ensuring your new centerpiece is as functional as it is beautiful.
How to Get Your Tub Perfectly Level and Stable
A wobbly tub isn’t just annoying; it’s a problem waiting to happen. An unlevel tub can cause water to pool, strain your plumbing connections, and create an unstable, unsafe environment. Getting this step right is one of the most critical parts of a successful bathroom remodeling project. It ensures your tub drains correctly and feels completely solid for years of relaxing soaks. The goal is zero movement, and here’s how our team ensures every tub we install is perfectly secure.
Use the Adjustable Feet and Shims
Most freestanding tubs come with adjustable feet, which are your first line of defense against an uneven floor. Start by placing the tub in its final spot and gently rocking it to see where it’s unstable. Lift the tub slightly (you’ll likely need a helper for this) and turn the threaded feet up or down to make adjustments. You may need to set the tub down and lift it a few times to get it just right. If your floor has a significant slope or dip, the feet might not be enough. In that case, thin plastic shims are your best friend. Slide them under the feet or base to fill any gaps and create a solid foundation.
Test for Any Wobbling or Movement
Once you think you’ve got it, it’s time to double-check your work. Place a carpenter’s level across the top rim of the tub, checking it both lengthwise and widthwise. The bubble should be perfectly centered. Next, firmly press down on every corner and along the sides of the tub. Try to make it rock. If you feel any give, wobble, or movement at all, it’s not ready. You’ll need to go back to the adjustable feet and shims to fine-tune the balance. This is a non-negotiable step in our process, as a perfectly stable tub is the mark of a professional installation.
Do One Final Stability Check
Your final check happens after the drain is connected and the tub is sealed to the floor with silicone. Fill the tub completely with water and let it sit for at least a few hours, or even overnight. The weight of the water does two important things: it settles the tub firmly into place, and it puts the drain connections under real-world pressure, making it easy to spot any slow leaks. This water test is the ultimate confirmation that your tub is level, stable, and ready for use. Once it passes this final inspection, you can drain the water and have complete confidence in your installation.
Common Installation Mistakes (and How to Avoid Them)
Installing a freestanding tub is a precise job where small details make a huge difference. A single misstep can lead to frustrating problems down the road, like slow drains, hidden leaks, or an unstable tub that wobbles every time you use it. The good news is that these common mistakes are entirely preventable with careful planning and the right technique.
Knowing what to watch for is half the battle. Whether you’re a seasoned DIYer or just want to understand what your contractor should be doing, familiarizing yourself with these potential pitfalls is key. A professional installation process is designed to catch these issues before they become costly headaches. For us, every bathroom remodeling project includes checks and balances to ensure every connection is secure, every angle is perfect, and your new tub is built to last. Let’s walk through the most frequent installation errors and, more importantly, how to get them right.
Mistake #1: Skipping the Dry-Fit
A “dry-fit” is exactly what it sounds like: placing the tub in its final position without any sealant or permanent connections. It might seem like an extra step, but it’s one of the most critical moments in the entire installation. Skipping it is like trying to hang a gallery wall without measuring first. This is your chance to confirm that the tub drain aligns perfectly with the floor pipe, the faucet reaches the right spot, and there’s enough clearance around the tub for cleaning and movement. Catching a misalignment at this stage is a simple adjustment; catching it after the silicone is applied is a major problem.
Mistake #2: Misaligning the Drain
This is a classic mistake that causes persistent issues. If the tub’s drain assembly isn’t perfectly aligned with the rough-in plumbing in your floor, you’re setting yourself up for slow drainage or, worse, a constant, slow leak that can damage your subfloor over time. The connection needs to be straight and stress-free. Forcing the pipes to connect at an angle puts pressure on the seals and guarantees they will fail eventually. The solution is patience and precision during the dry-fit. Measure carefully, use the manufacturer’s template, and make any necessary adjustments to the plumbing before you set the tub for good.
Mistake #3: Over-Tightening the Connections
When you’re working with plumbing, it’s natural to think “tighter is better” to prevent leaks. However, over-tightening the drain fittings and water lines can do more harm than good. The rubber or silicone gaskets that create a watertight seal are designed to compress just enough to close any gaps. If you crank down on the connections with too much force, you can crack the plastic fittings or warp the gaskets, which ironically creates the very leak you were trying to prevent. The correct approach is to hand-tighten the connections first, then use a wrench for a final quarter-turn until it feels snug.
Mistake #4: Forgetting to Reinforce the Floor
This is a big one, and it’s all about safety and structural integrity. A freestanding tub is incredibly heavy on its own. Now, add 50 to 80 gallons of water and a person, and you could easily have over 1,000 pounds concentrated in one spot. Many bathroom floors, especially in older San Diego homes, were not built to support that kind of load without extra support. Without proper reinforcement, the floor can sag, tiles can crack, and in a worst-case scenario, the structure could fail. A proper assessment during the planning phase of our process ensures your floor joists are ready for the weight, often by adding cross-bracing for extra stability.
How to Create a Watertight Seal
A freestanding tub is a stunning centerpiece, but its beauty is only matched by its function when the installation is completely leak-proof. Even a tiny, slow drip can lead to serious water damage, mold growth, and expensive repairs down the line. Creating a watertight seal is one of the most critical parts of the installation process, where patience and precision pay off. It’s not just about connecting pipes; it’s about creating durable joints that can withstand years of use.
The process comes down to three key actions: using the right sealing materials on your threaded connections, applying the perfect amount of torque (not too much, not too little), and performing a thorough leak test before you call the job done. Skipping or rushing any of these steps can compromise the entire installation. Taking the time to get this right ensures your new bathroom remodel remains a source of relaxation, not a cause for concern. Think of it as the final quality check that protects your investment and your home.
Use Teflon Tape and Pipe Dope Correctly
For any threaded plumbing connection, you need a sealant to fill the microscopic gaps between the threads. This is where Teflon tape and pipe dope (also called pipe joint compound) come in. Teflon tape is a thin, non-sticky tape that you wrap around the male threads before screwing two fittings together. Always wrap the tape clockwise, or in the same direction the fitting will tighten. This prevents the tape from bunching up or unraveling. Three to four wraps are usually enough. Pipe dope is a paste-like sealant that you brush onto the threads to create a flexible, leak-proof seal. Both are effective, and some plumbers even use them together for extra security.
Secure Connections Without Over-Tightening
It’s tempting to think that tighter is always better when it comes to plumbing, but that’s a common mistake. Over-tightening fittings can do more harm than good. When you apply too much force, you can crack the plastic or metal components or, more commonly, damage the rubber gaskets designed to create the seal. A crushed or warped gasket won’t be able to do its job, which ironically causes the very leak you were trying to prevent. The goal is to tighten connections until they are snug. Hand-tighten first, then use a wrench for a final quarter- or half-turn. The connection should feel firm and secure, not strained.
Test Every Connection Point for Leaks
Once everything is connected, it’s time for the moment of truth. Before you apply any silicone around the base of the tub, you need to conduct a thorough water test. Start by plugging the tub’s drain and slowly filling it with a few inches of water. Let it sit for at least 10 to 15 minutes. While the water is in the tub, get a flashlight and a dry paper towel and carefully inspect every single connection point underneath. Run the paper towel along the bottom of each joint. Even the smallest bead of moisture will show up immediately. If you find a leak, drain the tub, adjust the gasket, and carefully re-tighten the connection before testing again. It’s much easier to fix a drip now than after your beautiful new flooring is installed.
The Final Steps: Sealing and Water Testing
You’re almost at the finish line. These final checks are what separate a good installation from a great one, ensuring your new tub is a source of relaxation, not future headaches. Taking the time to seal and test everything properly protects your investment and your home. This is a critical part of any professional bathroom remodeling project, and it’s just as important for a DIY installation.
Apply a High-Quality Silicone Sealant
To create a clean, waterproof barrier, run a smooth bead of high-quality silicone sealant around the entire base of the tub where it meets the floor. This simple step is your best defense against water seeping underneath, which can lead to mold, mildew, and damage to your subfloor over time. A proper seal not only protects your flooring but also helps secure the tub in place, giving it a clean, finished look. Make sure to smooth the bead for a professional appearance before it starts to cure.
Run a Full Leak Test
Once the sealant has had at least 24 hours to fully cure, it’s time for the moment of truth. Fill the tub completely with water and carefully inspect all the plumbing connections underneath for any signs of dripping. If you spot a leak, drain the tub, tighten the connection, and test it again. This step is non-negotiable. Catching a small drip now can save you from major water damage down the road. At King Remodeling, this type of quality check is a standard part of Our Process to guarantee a flawless result.
Make Your Final Adjustments
With the tub full of water, grab your level one last time and check it across the top edges. The weight of the water will settle the tub into its final position, revealing if any minor adjustments are needed. If it’s not perfectly level, you can use thin shims under the feet to correct it. A perfectly level tub won’t rock or shift, giving you a secure and comfortable bathing experience every time. It’s this attention to detail that defines the beautiful, lasting results you see in our Featured Projects.
How to Care for Your New Freestanding Tub
Your freestanding tub is the centerpiece of your new bathroom, and with a little routine care, it will stay looking brand new for years. Keeping it pristine isn’t complicated; it just takes consistency and the right approach. A simple cleaning habit prevents soap scum and grime from building up, protecting the tub’s finish and ensuring it’s always ready for a relaxing soak. By using the right cleaners and performing quick inspections, you can easily maintain its beauty and function. Think of it as a small investment of time to protect the beautiful focal point of your bathroom remodel. This simple maintenance routine will keep your tub looking as stunning as the day it was installed.
Clean Your Tub and Inspect Seals Regularly
The easiest way to keep your tub clean is to give it a quick rinse with clean water after every bath. This simple step washes away soap residue and dirt before it has a chance to stick and harden. For a deeper clean, wash the tub weekly with a mild, non-abrasive bathroom cleaner and a soft sponge or cloth. This prevents buildup and keeps the surface gleaming without causing scratches. While you’re cleaning, take a moment to inspect the silicone sealant around the base of the tub and the drain. Look for any signs of cracking, peeling, or gaps. A strong, intact seal is crucial for preventing leaks and water damage to your subfloor, so catching any issues early is key.
Choose the Right Cleaners for Your Tub’s Material
Not all cleaners are created equal, and using the wrong one can permanently damage your tub’s finish. Always avoid abrasive powders, rough scouring pads, and harsh chemicals like bleach or ammonia. Even if your tub is made from a durable material like acrylic, these aggressive cleaners can create fine scratches or dull the surface over time. For most materials, a simple solution of warm water and a few drops of mild dish soap is all you need for effective, safe cleaning. Apply it with a soft cloth, gently wipe the surface, and rinse thoroughly. This gentle approach is the best way to protect your investment and keep your tub looking flawless for years to come.
Tips for Long-Term Care and Simple Fixes
For tougher stains or slight discoloration, you don’t need to reach for a harsh chemical cleaner. A simple paste made from baking soda and hydrogen peroxide can often do the trick. Apply it to the stain, let it sit for a few minutes, and gently scrub with a soft sponge before rinsing. It’s a great, non-toxic way to tackle stubborn spots. You can see how pristine these tubs look in our gallery of featured projects. Also, be sure to fix any dripping faucets right away. A constant drip not only wastes water but also leads to hard water stains and mineral buildup that can be difficult to remove and may even etch the tub’s surface over time.
Related Articles
- Replace Alcove Tub with Freestanding: Complete Guide | King Remodeling
- How to Replace Alcove Tub with Freestanding: Step-by-Step
Frequently Asked Questions
How much space should I really leave around my freestanding tub? While the exact amount depends on your bathroom’s layout, we recommend leaving at least four to six inches of clearance on all sides. This isn’t just for looks; it’s incredibly practical. This buffer zone makes cleaning around the tub much easier, preventing dust and grime from getting trapped in tight corners. It also gives you comfortable standing room to get in and out without feeling cramped against a wall or vanity.
Can I install a freestanding tub on a second-floor bathroom? Yes, you absolutely can, but it requires a crucial first step: confirming your floor can handle the weight. A tub filled with water and a person can weigh over 800 pounds, and not all second-story floors are built to support that concentrated load. Before you purchase a tub, it’s essential to have a professional assess your floor joists to see if they need reinforcement. This ensures the installation is safe and protects your home’s structural integrity.
What kind of faucet works best with a freestanding tub? You have a few great options, and the best choice depends on your tub’s design and your personal style. Floor-mounted fillers, which rise up from the floor, create a dramatic, elegant look. Deck-mounted faucets are installed directly onto the rim of the tub itself, offering a more integrated and classic feel. A third option is a wall-mounted faucet, which works well if you place your tub close to a wall and want a clean, minimalist appearance.
How long does the installation process typically take? For a professional, the hands-on installation of the tub itself, including connecting the plumbing and sealing the base, can usually be completed in a single day. However, this doesn’t include the prep work. The entire process, from ensuring the floor is level and reinforced to having the plumbing roughed-in at the correct spot, happens before the tub even enters the room. When planned correctly as part of a full remodel, the final tub installation is one of the last, and quickest, steps.
What’s the most common mistake people make when installing these tubs? The most frequent and costly mistake is skipping a thorough dry-fit. It’s tempting to want to get the tub set and sealed quickly, but placing it without first confirming the drain alignment is a recipe for problems. A misaligned drain can lead to slow draining or persistent leaks that can damage your subfloor. Taking the time to set the tub, trace its outline, and double-check all connections before applying any sealant is the single most important step to a successful, leak-free installation.