King Remodeling has completed thousands of bathroom renovations across San Diego County over the past 25 years, and we can tell you from experience: the order you install things matters more than the materials you choose. Getting the bathroom remodel order of installation wrong leads to damaged finishes, failed inspections, and costly rework that can add weeks to your timeline. This guide walks you through every phase of a professional bathroom renovation, from the first permit application to the final coat of paint, so you know exactly what to expect and why each step happens when it does.
What Is the Correct Order of Installation for a Bathroom Remodel?
The correct order of installation for a bathroom remodel follows a proven 10-step sequence that professional contractors use to prevent damage, pass inspections, and deliver lasting results. King Remodeling follows this exact sequence on every San Diego bathroom renovation we complete.
Here is the complete bathroom remodel order of installation at a glance:
- Design, permits, and material ordering – Finalize layout, secure San Diego building permits, order all materials
- Demolition – Remove old fixtures, tile, flooring, and drywall
- Structural repairs – Fix any hidden water damage, rot, or framing issues
- Rough-in plumbing – Install new water supply lines, drain pipes, and shower valves
- Rough-in electrical – Run wiring for outlets, lighting, exhaust fan, and heated floors
- Inspections – City inspector verifies plumbing and electrical meet San Diego building codes
- Waterproofing, insulation, and drywall – Apply moisture barriers, hang cement board and drywall
- Tile installation – Set shower tile, floor tile, and any accent walls
- Fixture and cabinetry installation – Mount vanity, toilet, faucets, lighting, and mirrors
- Paint, trim, and finishing touches – Apply paint, install hardware, baseboards, and accessories
Each step in this sequence builds on the one before it. Skipping ahead or reversing the order creates problems that are expensive and time-consuming to fix. The sections below explain exactly what happens during each phase and why the sequence matters.
Why Does the Order of Operations Matter in a Bathroom Remodel?
Following the correct order of operations in a bathroom remodel protects your investment, prevents costly rework, and ensures the finished space holds up to daily use for decades. Here is why sequence matters so much in a bathroom renovation.
Protecting New Materials from Damage
The messiest work happens first by design. Demolition throws dust and debris everywhere. Plumbing and electrical rough-in require cutting into walls and floors. Drywall finishing creates fine dust that settles on every surface. If you installed a new vanity or toilet before completing these steps, you would risk scratches, chips, and staining on surfaces you just paid good money for.
By completing all the rough, dusty work before any finishes go in, every new surface stays protected. Your tile, cabinetry, and fixtures are installed into a clean, prepped space where they will not be disturbed again.
Meeting Building Code Requirements
San Diego building codes require inspections at specific stages of construction. The rough-in inspection, which verifies that plumbing pipes and electrical wiring are correctly installed, must happen before walls are closed up with drywall. If you skip this step and drywall over uninspected work, an inspector can require you to tear it all out and start over.
A professional design-build team like King Remodeling manages the entire permitting and inspection process, ensuring every phase is completed in the order the city requires. This protects your home’s safety and its resale value.
Saving Time and Money
According to the National Association of Home Builders, rework caused by incorrect sequencing adds 15 to 20 percent to the average bathroom renovation budget. On a $25,000 San Diego bathroom remodel, that is $3,750 to $5,000 in avoidable costs. Following the correct order the first time is the simplest way to stay on budget and on schedule.
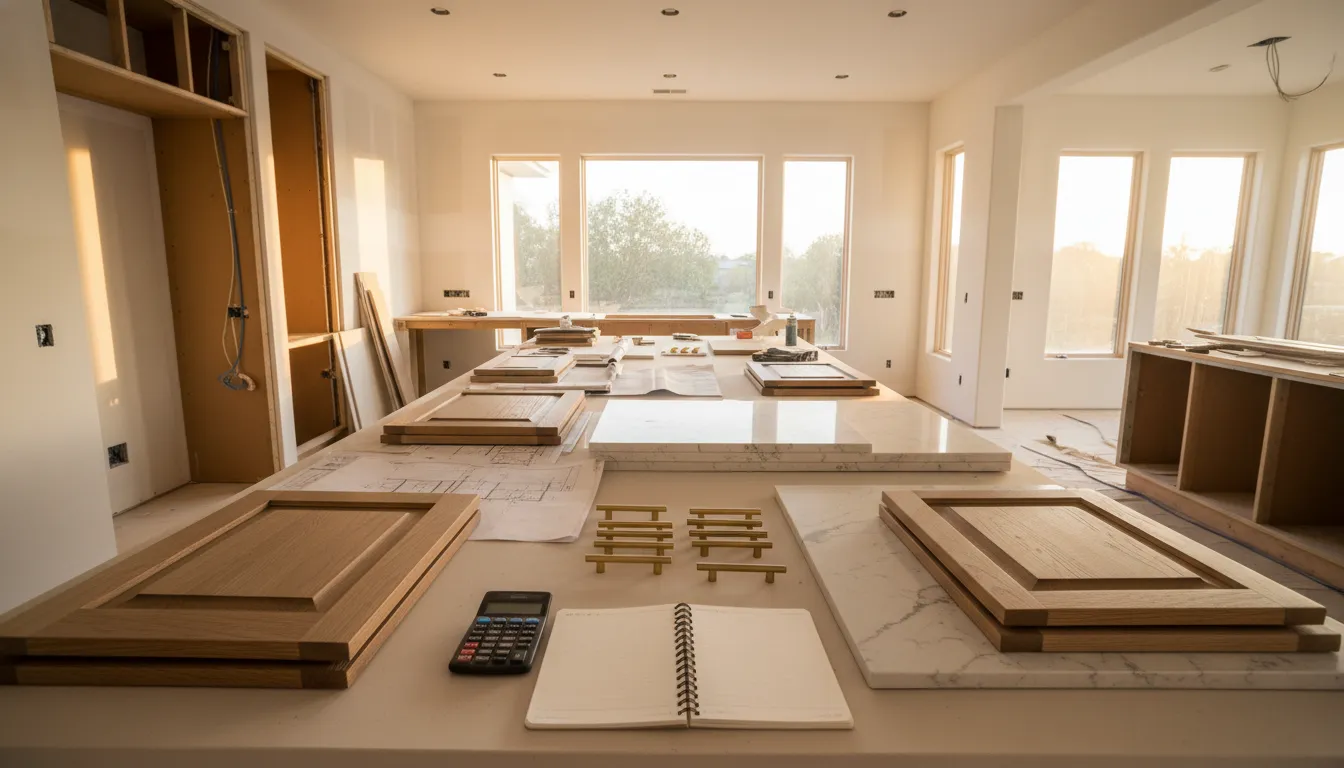
Phase 1: Design, Permits, and Material Ordering
A successful bathroom remodel starts well before any physical work begins. King Remodeling dedicates significant time to this planning phase because it prevents the delays and budget overruns that plague poorly planned projects.
Finalize Your Design and Layout
Work with your design team to finalize the bathroom layout, including the exact placement of the shower, vanity, toilet, and any built-in storage. King Remodeling’s private Design Center and Showroom gives San Diego homeowners a hands-on experience where you can see, touch, and compare materials with our design experts before making final selections.
This is also the time to make decisions about features that affect rough-in work: heated floors, a rain showerhead with body sprays, recessed medicine cabinets, or a freestanding tub. These choices determine where plumbing and electrical lines need to run, and changing them after rough-in is expensive.
Secure Your Building Permits
San Diego requires building permits for any bathroom remodel that involves plumbing changes, electrical modifications, or structural alterations. Permit fees in San Diego County typically range from $200 to $1,500 depending on project scope. Processing time averages 2 to 4 weeks for standard residential permits.
As part of our process, King Remodeling handles the entire permitting workflow, from submitting plans to scheduling inspections. This ensures every change meets local building codes and protects your home’s value at resale.
Order All Materials Before Demo Day
Custom vanities, specialty tile, and fixtures can have lead times of 4 to 12 weeks. Starting demolition before your materials arrive is one of the most common reasons bathroom remodels stall. A gutted, unusable bathroom sitting idle while you wait for a backordered vanity is a frustrating and avoidable problem.
Order everything, confirm delivery dates, and have materials on-site before the first hammer swings. This keeps your project moving at a steady pace from demo day through the final walkthrough.
Phase 2: Demolition and Structural Discovery
This is where the transformation begins. Demo day is exciting, but it is also the most important diagnostic stage of your project. Once old finishes are removed, your team gets a clear look at the condition of the structure behind the walls.
Remove Old Fixtures in the Correct Order
Professional demolition follows a specific sequence:
- Shut off the water supply to the bathroom
- Drain and remove the toilet to prevent leaks and free up floor space
- Disconnect and remove the vanity, sink, and cabinetry
- Remove the tub or shower surround, disconnecting plumbing before pulling the unit
- Strip wall tile and drywall to expose framing and plumbing
- Remove flooring to expose the subfloor
King Remodeling’s crews isolate the work area with plastic barriers and protective floor coverings to keep dust and debris out of the rest of your home. We handle the entire tear-out and haul away all old materials, leaving a clean slate for the new build.
Inspect for Hidden Damage
Demolition commonly reveals issues that were invisible before: water damage behind shower walls, outdated galvanized plumbing, mold growth, termite damage, or subfloor rot. According to industry data, roughly 30 to 40 percent of bathroom remodels uncover some form of hidden damage during demolition.
Finding these issues now, before new materials go in, is actually a good thing. It means they can be repaired properly. King Remodeling’s project managers communicate any findings to you immediately, explain the issue, and outline a clear plan and cost to fix it before moving forward. Having an experienced design-build team means we have the in-house expertise to handle structural repairs, plumbing updates, and mold remediation without bringing in outside contractors or derailing your timeline.
Phase 3: Rough-In Plumbing and Electrical
With the old bathroom gone and the framing exposed, your team installs the systems that power your new bathroom. This behind-the-walls work is the functional backbone of the entire project.
Install New Plumbing Lines
Licensed plumbers install new water supply lines, drain pipes, and vent stacks based on your approved design plan. If your layout involves moving the toilet, vanity, or shower to a new location, this is when new pipes are run to their exact positions.
Key rough-in plumbing work includes:
- Shower valve installation inside the wall (controls water temperature and pressure)
- Tub or shower pan placement to confirm drain alignment
- Toilet flange positioning at the correct height for your new flooring
- Vanity water supply and drain positioned to match your new cabinet dimensions
- Vent pipe routing for the exhaust fan, properly vented to the exterior (never into the attic)
Run Electrical Wiring
Electricians run all new wiring for lighting, outlets, switches, and any special features. This is the ideal time to add modern conveniences like an outlet inside a vanity drawer, a dedicated circuit for heated floors, or dimmer switches for layered bathroom lighting.
All bathroom outlets must be GFCI-protected per the National Electrical Code. In San Diego, additional requirements may apply for properties in coastal zones or historic districts. Your electrical rough-in should include:
- Junction boxes for vanity sconces, overhead lights, and recessed cans
- Dedicated circuits for high-draw items (heated floors, towel warmers)
- Exhaust fan wiring with proper CFM rating for your bathroom’s square footage
- Switches for separate lighting zones
Pass Your Rough-In Inspections
Before any walls are closed up, a San Diego city inspector must verify that all plumbing and electrical work meets current building codes. This is a non-negotiable step in any permitted remodel. The inspector checks pipe sizing, drain slope, wire gauge, GFCI protection, and code compliance.
King Remodeling coordinates and manages all inspections as part of our process, so you do not have to worry about scheduling or paperwork. Once the inspector signs off, we move on to waterproofing and drywall.
Phase 4: Waterproofing, Insulation, and Drywall
This phase transforms the open framing into a finished, sealed room. The quality of work here directly determines how well your tile, paint, and fixtures perform over time.
What Waterproofing Does Your Bathroom Need?
Proper waterproofing is the most critical behind-the-scenes step in any bathroom remodel. Without it, moisture penetrates walls and floors, leading to mold, rot, and structural damage that can cost thousands to repair.
King Remodeling applies a multi-layered waterproofing system in all wet areas:
- Liquid waterproofing membrane on shower walls, floor, and curb (creates a seamless, impenetrable seal)
- Cement backer board (not regular drywall) behind all tiled surfaces
- Shower pan liner or mud bed with proper slope toward the drain
- Seam tape and waterproof corners at all joints and transitions
This comprehensive approach ensures your bathroom remodel is protected against moisture for decades, not just the first few years.
Hang and Finish Drywall
With waterproofing complete, the room starts to take its final shape:
- Cement backer board goes up in shower and tub surrounds (stable, water-resistant substrate for tile)
- Moisture-resistant drywall is installed on remaining walls and ceiling
- Tape, mud, and sand all seams to create a perfectly smooth surface
This meticulous finishing ensures no visible lines or imperfections, creating a clean canvas for paint and tile. You can see the results of this careful prep work in our featured projects.
Install Ventilation
A properly sized exhaust fan is your bathroom’s best defense against moisture, mold, and mildew. The fan must be vented directly to the exterior of your home, never into an attic or crawl space. King Remodeling sizes every exhaust fan based on your bathroom’s square footage and the number of fixtures, ensuring adequate air exchange to protect your paint, cabinetry, and fixtures.
Phase 5: Tile Installation
Tile is one of the most visible and impactful elements of your bathroom remodel, and it goes in before any fixtures or cabinetry for important practical reasons.
Why Is Tile Installed Before the Vanity and Toilet?
Tile is installed before the vanity and toilet because tiling is a messy process that involves mortar, grout, and cutting. Setting tile around a fixture creates awkward cuts, uneven grout lines, and puts your new cabinets and porcelain at risk of scratches and stains. Installing a continuous tile floor first creates a clean, waterproof surface. The vanity and toilet are then placed on top, which also makes future replacements simpler because you do not have to cut new tile to fill the gap.
Floor Tile Installation
The floor is typically the first major finish to go in. Whether you have chosen porcelain, ceramic, natural stone, or luxury vinyl, installing flooring first creates a continuous surface for all other elements to sit on. King Remodeling’s tile installers plan the layout carefully, starting from the most visible wall to ensure full tiles are in the most prominent positions.
Shower and Wall Tile
After the floor is set, attention turns to the shower enclosure and any accent walls. Tile is installed from the base of the shower pan upward, with each row checked for level. Proper installation here is critical for both aesthetics and long-term water protection. Grout is applied, sealed, and cured before any fixtures are installed nearby.
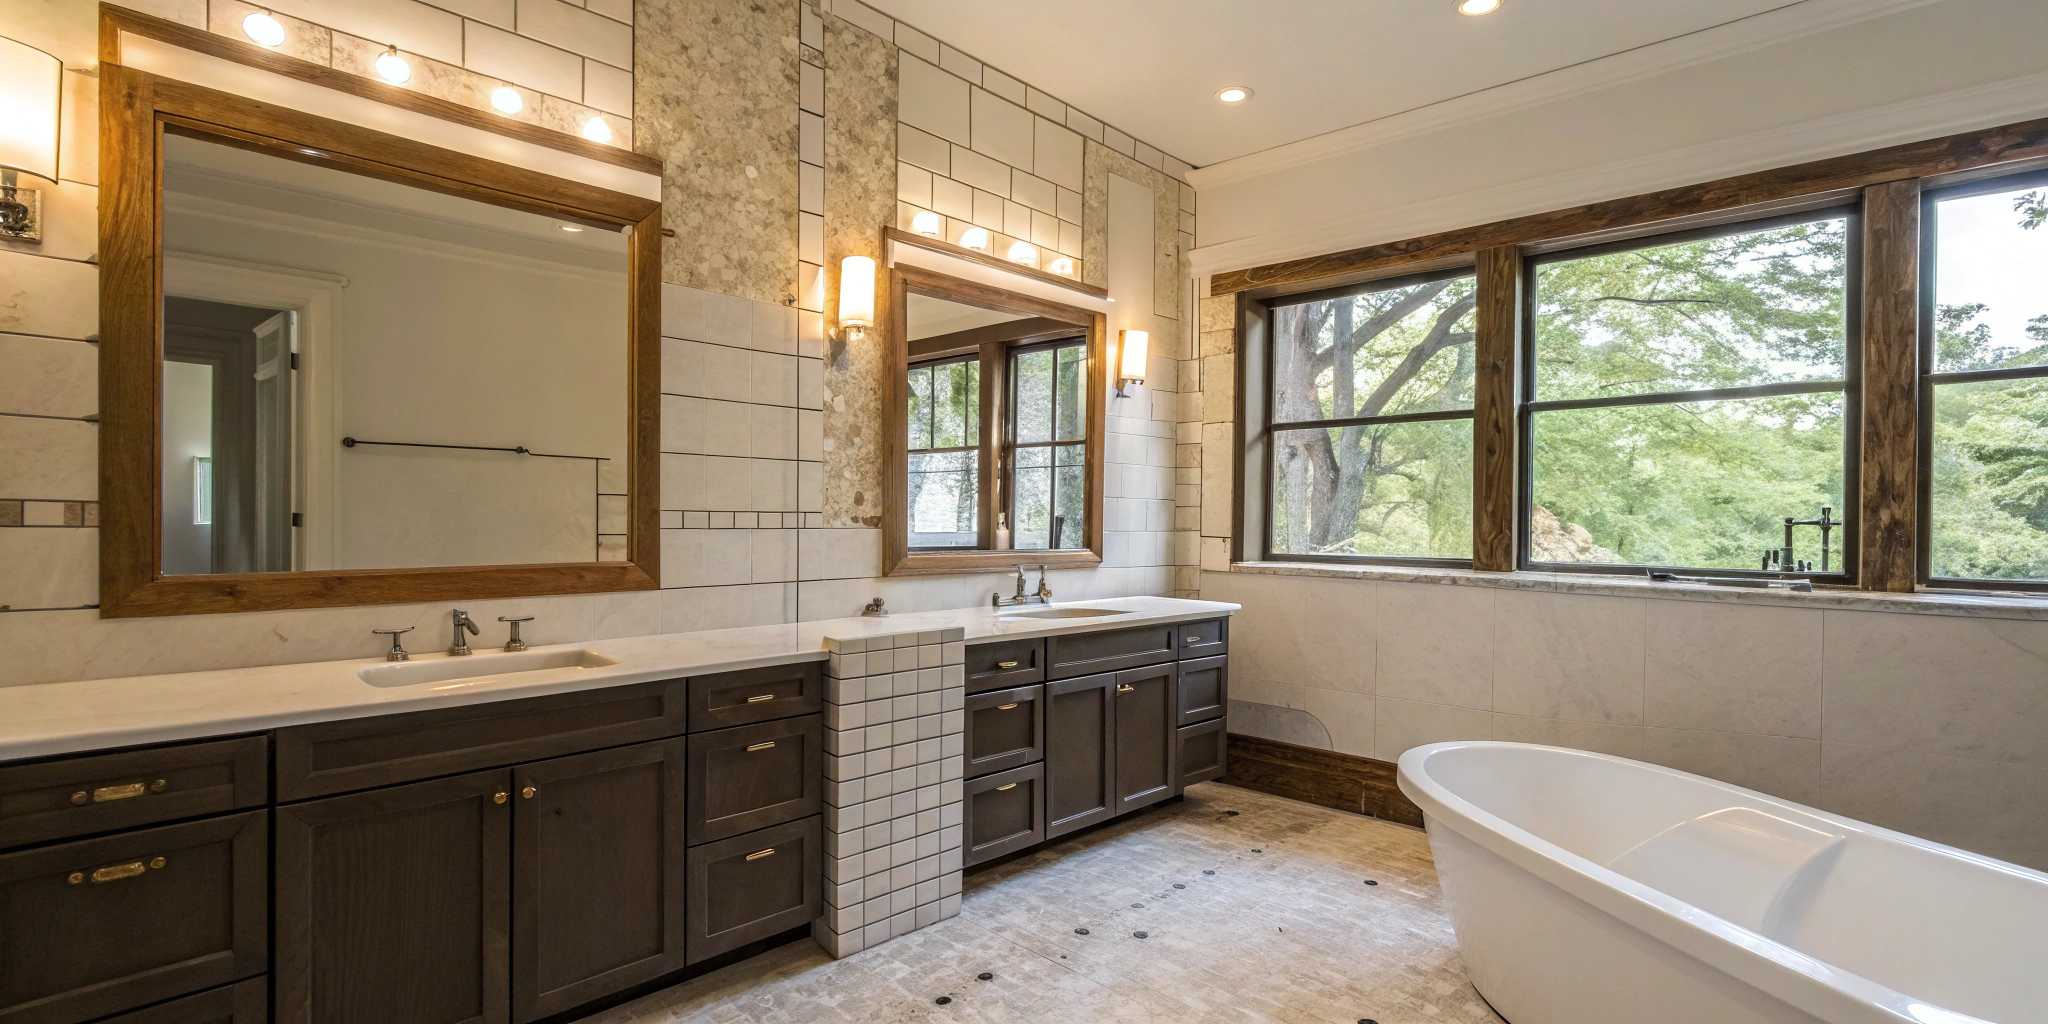
Phase 6: Fixture and Cabinetry Installation
With all tile work complete and cured, the room is ready for the pieces that make it functional.
Set the Vanity and Cabinetry
The vanity, linen towers, and any built-in storage cabinets are carefully moved into place and secured to the wall. Because electrical and plumbing were planned in Phase 3, your outlets and water connections will be positioned exactly where your vanity needs them. Setting the vanity on top of the finished floor creates a clean installation and simplifies future replacements.
Install the Toilet
The toilet is typically one of the last fixtures installed to prevent accidental chips or scratches during other work. The wax ring is set, the toilet is positioned over the flange, and water connections are made. King Remodeling tests every toilet for proper flush performance and leak-free operation before moving on.
Connect Faucets, Shower Trim, and Lighting
This is where the room gets its sparkle. Licensed plumbers install the sink faucet, shower trim (handle, showerhead, and any body sprays), and make all final water connections. Electricians install vanity lights, overhead fixtures, and the exhaust fan cover. Mirrors and medicine cabinets are hung, instantly making the room feel larger and brighter.
Phase 7: Paint, Trim, and Finishing Touches
The final phase adds polish and personality to your new bathroom.
Paint and Trim
Painting happens after tile, vanity, and fixture installation to avoid scuffs and damage from heavy items being moved around. King Remodeling recommends a high-quality, moisture-resistant paint in a satin or semi-gloss finish for bathrooms. These sheens resist humidity and are easy to wipe clean. Baseboards and door trim are installed after painting for crisp, clean lines.
Hardware and Accessories
This is where the design comes together. All the hardware you selected at our Design Center is installed: cabinet pulls and knobs, towel bars, robe hooks, toilet paper holder, and any shelving. Proper placement ensures everything is level, secure, and positioned for convenient daily use.
Final Testing and Walkthrough
The last step is making everything fully operational. Licensed electricians and plumbers complete all final hookups, and every system is tested:
- Run all faucets and check for leaks at every connection
- Flush the toilet multiple times
- Test the shower at full pressure
- Verify the exhaust fan pulls air correctly
- Check every light, switch, and outlet
- Confirm GFCI outlets trip and reset properly
King Remodeling conducts a detailed final walkthrough with every homeowner, going room-by-room to verify that the finished bathroom remodel meets your expectations and our quality standards.
What Are the Most Common Bathroom Remodel Sequencing Mistakes?
Even experienced DIYers make sequencing errors that turn a straightforward remodel into a costly headache. Here are the three mistakes King Remodeling sees most often, and how to avoid each one.
Starting Demo Before Materials Arrive
Starting demolition before your vanity, tile, and fixtures are on-site is the number one cause of project delays. Many custom items have lead times of 6 to 12 weeks. A gutted bathroom sitting idle while you wait for a backordered product is frustrating, expensive, and completely avoidable. Always confirm that every major material is in hand before demo day.
Installing Fixtures Before Tile
Placing the vanity, toilet, or tub before tile is complete puts new surfaces at risk of damage from mortar, grout, and cutting tools. It also creates awkward tile cuts and uneven transitions around fixture bases. Professional contractors always complete all tile work first, then install fixtures on top of finished surfaces.
Skipping or Rushing Waterproofing
Waterproofing is not optional. Skipping this step or using the wrong materials leads to moisture penetration, mold growth, and structural rot that can require a second full remodel within a few years. King Remodeling uses a multi-layered waterproofing system in every wet area, because the cost of doing it right the first time is a fraction of the cost of repairing water damage later.
How Long Does Each Phase of a Bathroom Remodel Take?
A full bathroom remodel in San Diego typically takes 3 to 6 weeks of active construction, depending on the project’s complexity. Here is a realistic timeline breakdown for each phase:
| Phase | Typical Duration | Notes |
|---|---|---|
| Design, permits, materials | 4-8 weeks | Happens before construction starts |
| Demolition | 1-2 days | Depends on bathroom size and scope |
| Structural repairs | 1-3 days | Only if hidden damage is found |
| Rough-in plumbing and electrical | 2-4 days | More complex layouts take longer |
| Inspections | 1-3 days | Depends on city scheduling |
| Waterproofing and drywall | 3-5 days | Includes drying and curing time |
| Tile installation | 3-7 days | Varies by tile complexity and area |
| Fixture and cabinetry | 2-3 days | Vanity, toilet, faucets, lighting |
| Paint, trim, finishing touches | 2-3 days | Final details and walkthrough |
| Total construction time | 3-6 weeks | Excluding pre-construction planning |
For a more detailed breakdown, see our guide on how long a bathroom remodel takes.
How to Choose the Right Contractor for Your Bathroom Remodel
Choosing the right contractor is just as important as following the right installation order. A good contractor manages the entire sequence, coordinates all trades, and handles inspections so you do not have to.
Look for a Design-Build Firm
A design-build firm like King Remodeling handles design, materials, and construction under one roof. This eliminates the communication gaps and scheduling conflicts that happen when you hire separate designers, material suppliers, and contractors. One team, one point of contact, one clear timeline.
Verify Licensing and Insurance
In California, any contractor performing work over $500 must hold a valid CSLB license. Verify your contractor’s license status at the California State License Board website. Also confirm they carry general liability insurance and workers’ compensation coverage.
Ask About Their Process
A reputable contractor should be able to walk you through their exact installation sequence, explain why each step happens in that order, and provide a written timeline. King Remodeling’s structured process includes daily communication, fixed-bid pricing, and a dedicated project manager for every remodel.
Frequently Asked Questions
What is the first thing to install in a bathroom remodel?
The first physical installation in a bathroom remodel is the rough-in plumbing and electrical. After demolition and any structural repairs, licensed plumbers and electricians install new water lines, drain pipes, wiring, and vent stacks inside the walls and under the floor. This behind-the-walls work must be completed and inspected before drywall, tile, or any visible finishes are installed.
Can I live in my home during a bathroom remodel?
Yes, most homeowners stay in their home throughout the entire renovation. King Remodeling seals off the work area with plastic barriers, lays down protective floor coverings, and cleans the job site daily. If the project involves your only bathroom, we help you plan alternative arrangements for showering and daily routines to minimize inconvenience.
What happens if hidden damage is found during demolition?
It is fairly common to uncover hidden water damage, outdated plumbing, mold, or structural issues once walls are opened up. Roughly 30 to 40 percent of bathroom remodels reveal some form of hidden damage. When this happens, King Remodeling’s project manager stops work, shows you exactly what was found, and presents a clear plan and cost to fix it properly before new materials are installed.
Why is waterproofing so important in a bathroom remodel?
Waterproofing creates an impenetrable barrier between your finished tile surfaces and the structural framing of your home. Without it, moisture from daily shower use gradually penetrates walls and floors, leading to mold growth, wood rot, and structural damage. A professional waterproofing system applied correctly adds years of life to your bathroom and prevents repairs that can cost thousands of dollars.
How much does a bathroom remodel cost in San Diego in 2026?
A standard bathroom remodel in San Diego typically costs between $15,000 and $40,000, depending on the size of the bathroom, scope of work, and quality of materials. A high-end master bathroom renovation with custom tile, premium fixtures, and layout changes can range from $40,000 to $75,000 or more. King Remodeling provides fixed-bid pricing so you know the total cost upfront before work begins. For a detailed cost breakdown, see our bathroom remodel cost guide.
Do I need a permit for a bathroom remodel in San Diego?
Yes, if your remodel involves plumbing changes, electrical modifications, or structural alterations, you need a permit from the City of San Diego Development Services Department. Permit fees typically range from $200 to $1,500 depending on scope. Permits ensure all work meets current building codes, which protects your safety and your home’s resale value. King Remodeling handles the entire permitting and inspection process for every project.
What is the order of trades in a bathroom renovation?
The order of trades in a bathroom renovation follows the construction sequence: demolition crew first, then plumbers for rough-in, electricians for wiring, drywall contractors for walls, tile installers for surfaces, then plumbers and electricians return for final fixture hookups and connections. A design-build firm like King Remodeling coordinates all trades in-house, eliminating scheduling conflicts between separate contractors.
Should I install the floor or shower tile first?
Professional contractors typically install the floor tile first, then the shower tile. This creates a continuous, waterproof base that extends under the shower threshold. However, the shower pan or base is set during the rough-in phase before any tile goes in. The exact sequence can vary based on your bathroom’s layout and the type of shower system being installed. King Remodeling’s experienced tile installers determine the optimal sequence for each project.
Learn more about our get your project quoted first options.