Let’s talk about one of the biggest questions homeowners have: what does a remodel cost? With a small bathroom, the budget conversation is actually exciting. Because you’re working with less square footage, the high-end materials you’ve been admiring—that stunning marble tile or designer faucet—suddenly become much more attainable. This is the unique advantage of a small bathroom remodel; it’s an opportunity to invest in quality and create a truly luxurious feel without a massive price tag. Instead of focusing on limitations, think of it as a chance to get the maximum impact and value from every dollar you spend on this essential, hardworking room.
Key Takeaways
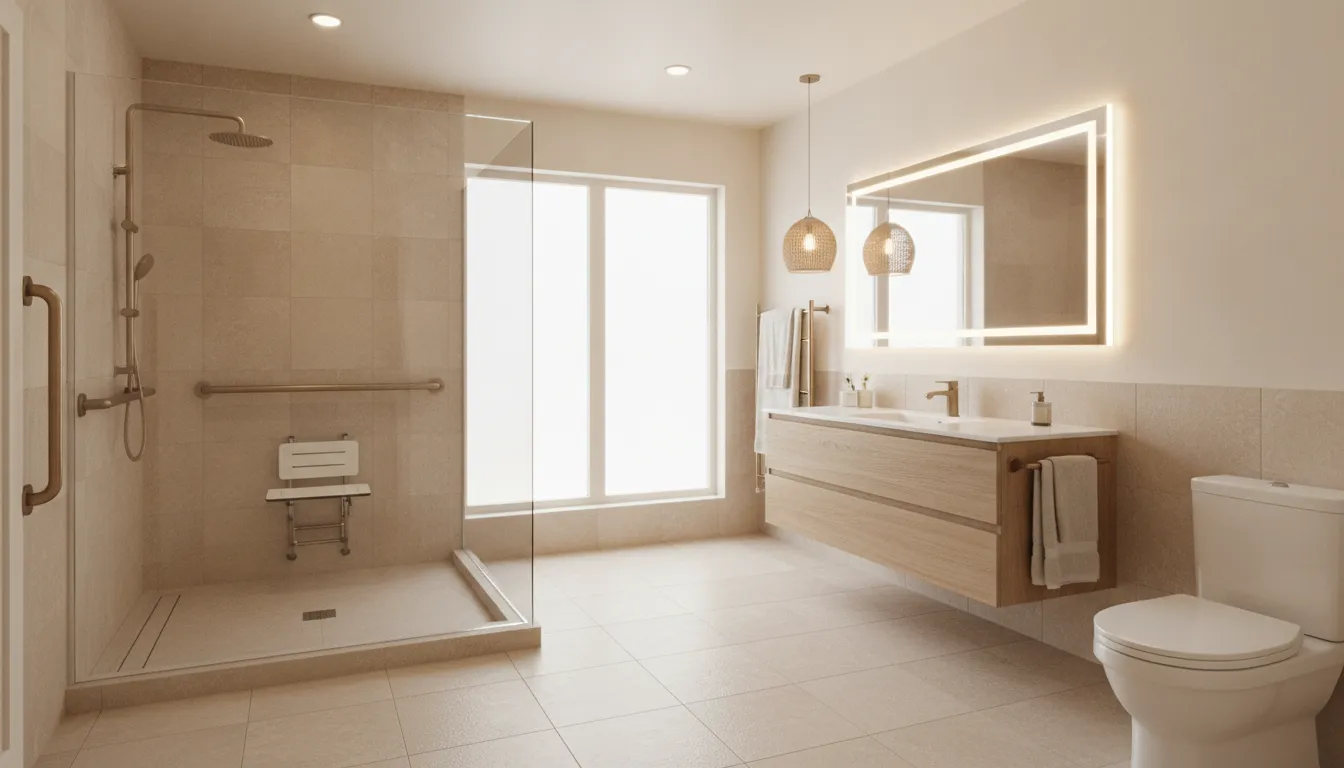
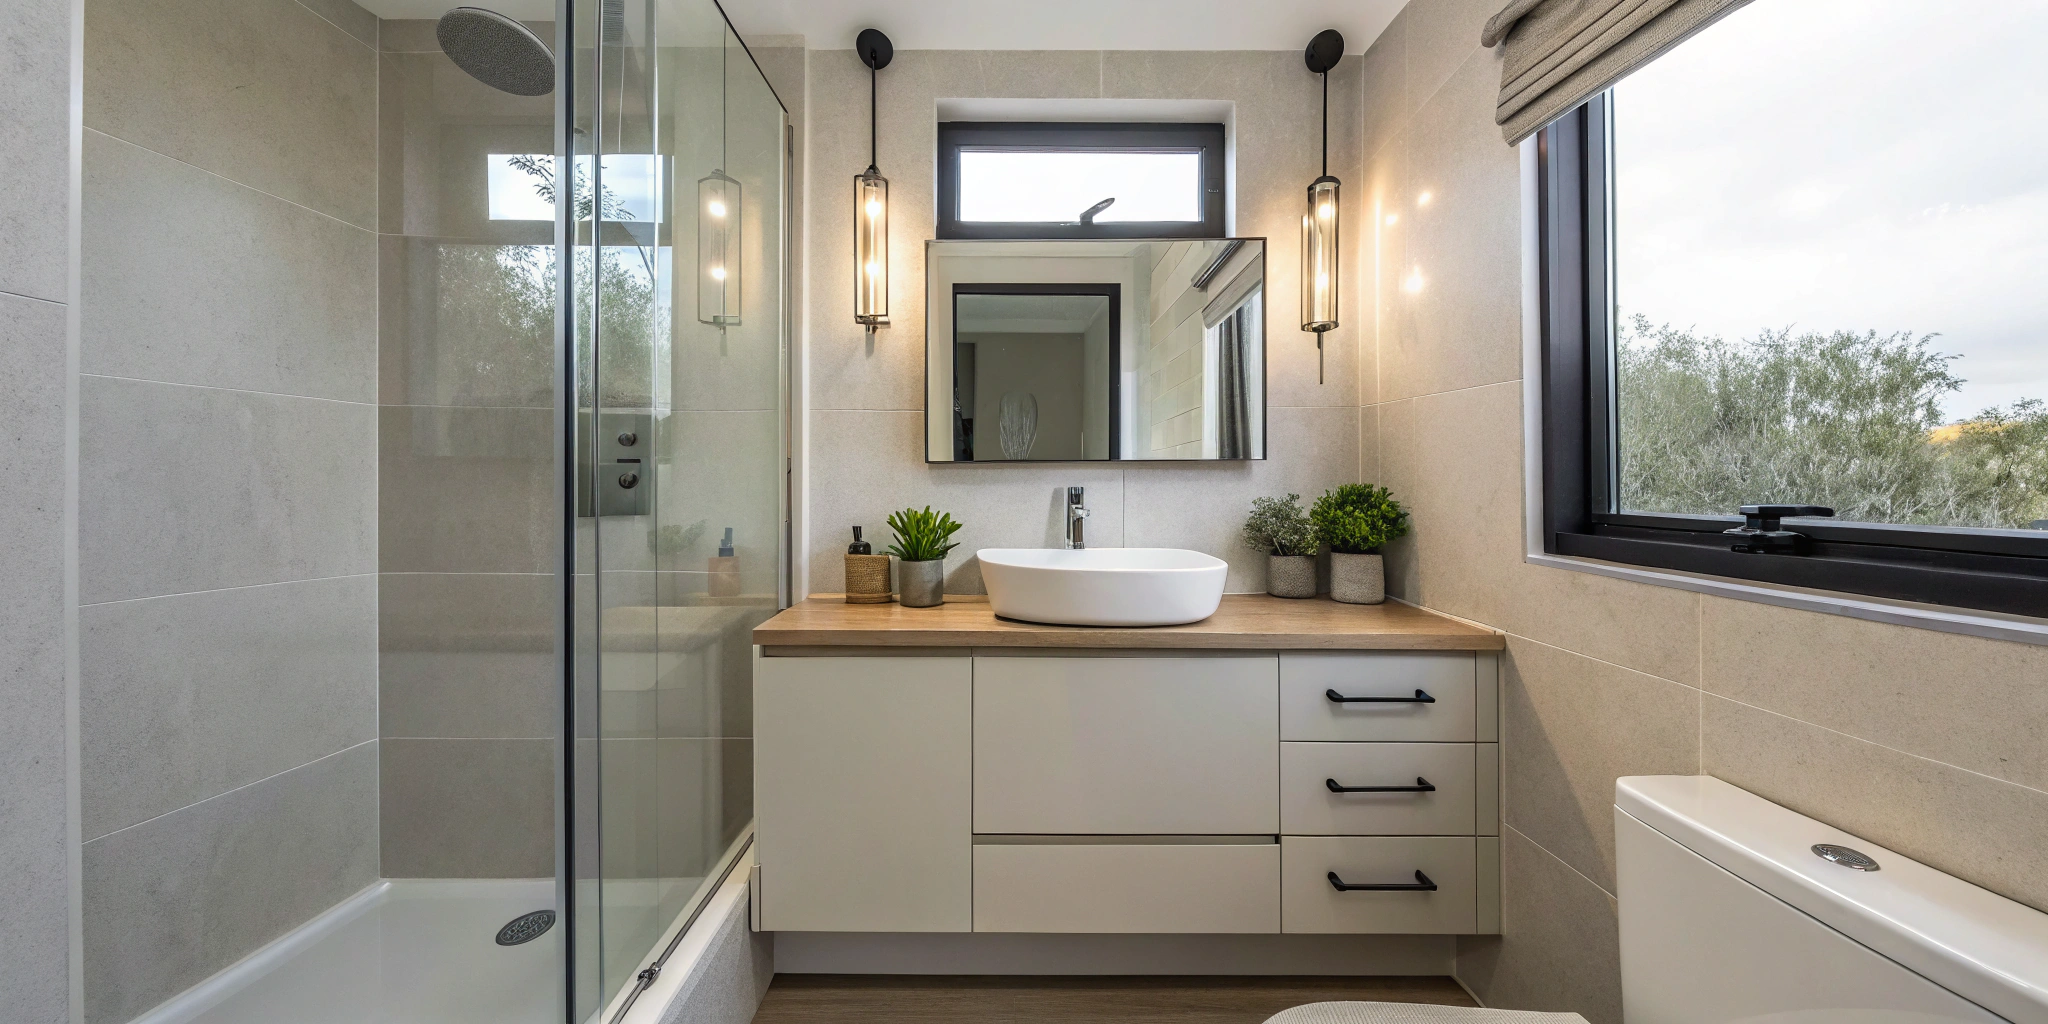
- Use visual strategies to make the room feel larger: Create the illusion of space with light paint colors, oversized mirrors, and seamless surfaces. Choosing large-format tiles for fewer grout lines and a frameless glass shower door removes visual clutter, making the bathroom feel more open and cohesive.
- Choose fixtures and storage that save physical space: Maximize your footprint by getting items off the floor. A floating vanity opens up the room and makes it easier to clean, while recessed shower niches and vertical shelving provide essential storage without taking up valuable square footage.
- Invest in a functional layout and professional installation: The most impactful changes often start with the floor plan. A professional is essential for optimizing the layout and safely handling complex plumbing, electrical, and permitting work, which protects your home and ensures a lasting result.
Design Ideas to Make Your Small Bathroom Feel Bigger
A small bathroom doesn’t have to feel cramped or cluttered. With the right design strategies, you can create a space that feels open, airy, and surprisingly spacious. It’s all about using visual tricks to fool the eye and making every square inch count. Instead of focusing on the limited footprint, think of it as a design challenge that rewards clever solutions. From color palettes to fixture choices, a few smart changes can completely transform the feel of the room.
Our design team specializes in turning compact San Diego bathrooms into functional, beautiful retreats. We focus on thoughtful layouts and material selections that maximize both style and space. Here are a few of our go-to design ideas for making any small bathroom feel bigger.
Use Light Colors and Reflective Surfaces
One of the simplest ways to open up a room is with color. Light and neutral tones—like soft whites, pale grays, and muted pastels—are your best friends in a small bathroom. They reflect light rather than absorb it, creating a bright and airy atmosphere. Consider a paint with a satin or high-gloss finish to bounce even more light around the room.
Beyond paint, you can incorporate reflective materials throughout your bathroom remodeling project. Think glossy ceramic tiles for the walls, polished chrome or nickel fixtures, and a quartz countertop with a bit of sheen. Swapping a shower curtain for a clear glass door also makes a huge difference, as it removes a visual barrier and allows your eye to see the entire length of the room.
Place Mirrors Strategically
Mirrors are a classic tool for creating the illusion of depth, and in a small bathroom, you should think big. While a standard vanity mirror is a good start, installing a large, oversized mirror that covers most of a wall can visually double the size of your space. It works by reflecting light and the room itself, almost like adding another window.
For an even more integrated look, consider a custom wall-to-wall mirror behind the vanity or a wall of mirrored tiles. Mirrored medicine cabinet doors are another great option, giving you reflective surfaces that double as hidden storage. You can explore different styles and finishes at our San Diego showroom to find the perfect fit for your design.
Install Wall-Mounted Fixtures and Floating Vanities
Lifting your fixtures off the ground is a game-changer in a small bathroom. When your eyes can see more of the floor, the brain perceives the room as larger and more open. A wall-mounted or “floating” vanity is a perfect example. It provides essential storage for toiletries without the visual bulk of a traditional cabinet that sits on the floor.
The same principle applies to your toilet. A wall-hung model conceals the tank inside the wall, saving precious floor space and creating a sleek, modern look. As a bonus, these wall-mounted fixtures make cleaning the floor much easier since there are no tight corners or bases to work around. You can see examples of how we’ve used these fixtures in our featured projects.
Think Vertically with Your Design
When you can’t build out, build up. Taking advantage of your bathroom’s vertical space is key to keeping it organized and clutter-free. Instead of letting toiletries pile up on the countertop, draw the eye upward with smart storage solutions. Tall, narrow linen towers, open shelving above the toilet, or a ladder-style shelf can hold towels and essentials without taking up valuable floor space.
Another fantastic option is incorporating recessed storage, like a built-in niche in the shower wall for shampoo and soap. This keeps things tidy without protruding into the space. Planning for these details is a core part of our process, ensuring your final design is as functional as it is beautiful.
What Does a Small Bathroom Remodel Cost in San Diego?
Let’s get straight to the point: figuring out the cost of a small bathroom remodel can feel like trying to hit a moving target. You’ll see a wide range of prices online because every project is different. In San Diego, a small bathroom update can range from a few thousand dollars for simple cosmetic changes to $15,000 or more for a complete overhaul. The final number depends entirely on three things: the scope of work, the materials you choose, and the labor required to bring it all together. That’s why online cost calculators can be so misleading—they can’t account for the unique layout of your home or your personal style.
Instead of focusing on a vague average, it’s more helpful to understand what drives the cost up or down. Are you just swapping out a vanity and painting the walls, or are you moving the toilet and shower? Do you have your heart set on imported marble tile, or are you looking for a beautiful and durable porcelain? Answering these questions is the first step toward building a realistic budget. Working with a design-build team helps you get a clear, fixed-price proposal for your bathroom remodeling project, so you know exactly what to expect before any work begins.
How Scope Affects Your Budget
The single biggest factor influencing your budget is the project’s scope—in other words, everything you plan to change. A simple refresh involving new paint, a modern vanity, and updated light fixtures will be on the lower end of the cost spectrum. However, if your remodel involves moving walls, changing the layout, or relocating plumbing, the price will increase significantly. Keeping your toilet, sink, and shower in their current locations is one of the most effective ways to manage costs, as moving plumbing lines requires extensive work behind the walls. Think of it as the difference between redecorating a room and rebuilding it from the studs out.
Key Factors That Drive the Final Price
Beyond the visible finishes, the “unseen” elements often have the biggest impact on your budget. Labor, plumbing, and electrical work are typically the most significant expenses. If your home is older, bringing the plumbing and electrical systems up to current San Diego building codes might be required, which can add to the cost. Skilled labor is an investment in quality and peace of mind. A professional team ensures everything is installed correctly, preventing costly leaks or electrical issues down the road. Our integrated design-build process accounts for these factors from the start, giving you a comprehensive plan that minimizes surprises.
Local Costs and Material Considerations
In San Diego, the cost for a bathroom remodel can average between $115 to $300 per square foot, but your material selections will cause that number to fluctuate. This is where you have the most control over your budget. For example, you can achieve a luxurious look with high-quality porcelain tile that mimics marble, saving you a significant amount compared to the real stone. The key is to find the right balance between style, durability, and price. Visiting our San Diego showroom allows you to see and touch different materials side-by-side, making it easier to choose beautiful, lasting finishes that align with your budget.
How to Choose Fixtures for a Small Bathroom
The fixtures you choose for your bathroom are more than just functional necessities; they’re major players in how spacious the room feels. A bulky vanity or a heavy, framed shower door can instantly make a small bathroom feel cramped and crowded. On the other hand, thoughtfully selected fixtures can create an open, airy atmosphere that feels both luxurious and comfortable. This is where smart design choices can completely transform your space, turning a tight powder room into a serene retreat.
Every decision, from the profile of your toilet to the style of your sink faucet, contributes to the final look and feel. The goal is to find pieces that serve their purpose without taking up unnecessary physical or visual space. Think sleek lines, minimal footprints, and multi-functional designs. This is a critical stage in any bathroom remodeling project, and getting it right means balancing your daily needs with clever space-saving strategies. Seeing how different fixtures look and feel in person can be a game-changer, helping you visualize the final result before making a commitment and ensuring every piece works in harmony.
Find Space-Saving Toilets and Sinks
One of the most effective ways to create the illusion of space is to get things off the floor. Instead of a traditional vanity cabinet that sits directly on the tile, consider a floating vanity. By mounting the cabinet to the wall, you expose the flooring underneath, which instantly makes the room feel larger and more open. As a bonus, it’s also much easier to clean under. Similarly, a wall-hung toilet conceals the tank within the wall, saving precious inches and contributing to a clean, minimalist aesthetic. If you don’t need extensive counter space or storage, a classic pedestal sink is another great option that offers timeless style with a very small footprint.
Decide Between a Shower and a Tub
Many homeowners feel pressured to include a bathtub, but it’s important to think about how you actually live. If you primarily take showers, dedicating a large portion of your small bathroom to a tub you’ll rarely use might not be the best choice. A spacious, walk-in shower can feel far more luxurious and practical than a cramped tub-shower combination. Opting for a curbless shower with a single glass panel creates a seamless transition from the rest of the bathroom, making the entire space feel like one cohesive room. You can explore our featured projects to see how other San Diego homeowners have made this decision.
Consider Frameless Glass and Corner Showers
Visual barriers, like shower curtains or thick metal frames on a shower door, can chop up a small bathroom and make it feel compartmentalized. A frameless glass shower enclosure is the perfect solution. It allows your eye to travel uninterrupted across the room, creating a sense of depth and allowing light to flow freely. For square-shaped bathrooms or tricky layouts, a corner shower can be a brilliant space-saver, tucking neatly away while leaving the center of the room open. To keep things clutter-free, ask your designer to include a built-in shower niche for storing shampoo and soap. Visiting a design showroom is a great way to compare different glass thicknesses and hardware finishes in person.
Using Light and Color to Create Space
When you’re working with a small bathroom, light and color are your best friends. These two elements have the power to completely transform a cramped room into a space that feels open, airy, and far more spacious than its actual square footage. It’s all about creating an illusion—making the walls feel like they’re further away and drawing the eye upward. A thoughtful approach to your color palette and lighting plan is one of the most effective strategies in any small bathroom remodeling project.
The right choices can make a windowless powder room feel bright or turn a narrow bathroom into a serene retreat. It’s not just about painting the walls white; it’s about how you combine finishes, fixtures, and different light sources to work together. By reflecting natural light, layering artificial light, and using a cohesive color scheme, you can create a bathroom that feels both functional and expansive. We guide our clients through these selections every day, helping them find the perfect combination of materials and fixtures to achieve this effect.
Make the Most of Natural Light
If your bathroom has a window, you’ve got a huge advantage. The key is to let as much of that natural San Diego sunshine in as possible. Swap a bulky shower curtain for a clear, frameless glass door. This simple change prevents the shower from visually cutting the room in half and allows light to flow freely from one end to the other. Large mirrors are another non-negotiable; they bounce light around the room and create a sense of depth, making the space feel twice its size. If privacy is a concern, consider frosted or reeded glass for the window, which diffuses light beautifully without the need for heavy blinds or curtains.
How to Layer Your Lighting
A single overhead light just won’t do in a small bathroom. It tends to cast shadows and can make the space feel cavelike. Instead, a layered lighting plan is the way to go. Combine different types of lights to create a bright, welcoming atmosphere. Start with ambient overhead lighting, like recessed cans or a stylish flush-mount fixture. Then, add bright task lighting around the mirror with sconces or a vanity light bar—this eliminates shadows when you’re getting ready. Adding dimmers gives you total control, allowing you to soften the lights for a relaxing bath. You can see great examples of layered lighting in our featured projects.
Choose Colors That Enlarge the Room
The color you paint your walls can dramatically impact how large the room feels. Stick to light, neutral paint colors like soft white, beige, or a cool gray. These shades are fantastic at reflecting light, which helps create that open and airy feeling. You can also use soft pastels, like a pale blue or a soft mint green, to add a touch of personality while still keeping things bright. For a seamless, expansive look, try painting the trim and ceiling the same color as the walls. This blurs the lines where the walls end and the ceiling begins, tricking the eye into seeing a taller, bigger space. Visiting a showroom can help you see how these colors and finishes look in person.
Clever Storage Solutions for Tight Spaces
A small bathroom doesn’t have to feel cluttered. The secret to a serene, functional space often comes down to smart storage. When every inch counts, you have to get creative with how you store toiletries, towels, and cleaning supplies. Instead of letting clutter take over your countertops, a thoughtful design can create a designated home for everything, making the room feel organized and surprisingly spacious. By building storage into the architecture of the room and choosing fixtures that work double-duty, you can keep your bathroom tidy and beautiful.
Our design team loves finding clever ways to integrate storage seamlessly. We’ve seen firsthand how the right solutions can completely transform a bathroom remodeling project. It’s not about adding bulky furniture; it’s about using the space you already have more effectively.
Add Recessed and Built-In Shelving
One of the best ways to gain storage without sacrificing floor space is to go into your walls. Recessed shelving, especially a shower niche for shampoo and soap, is a game-changer. It provides a sleek, custom-built spot for your daily essentials, eliminating the need for clunky shower caddies. Outside the shower, a recessed cabinet built between wall studs can store medicine and toiletries behind a clean, flush-mounted door. These built-in solutions look intentional and high-end, turning a simple wall into a functional feature while keeping visual clutter to a minimum.
Maximize Vertical Storage
When you can’t build out, build up. Vertical space is often the most underused asset in a small bathroom. Think about tall, narrow linen towers that draw the eye upward and offer generous storage for towels and backstock supplies. Open shelving installed above the toilet or door frame is perfect for decorative baskets or neatly folded towels. By using the full height of the room, you create more storage capacity without encroaching on the limited footprint. This strategy not only helps you get organized but also makes the ceiling feel higher and the room more open.
Select Multi-Functional Fixtures
In a compact bathroom, every piece should serve a purpose—or two. A floating vanity is a fantastic choice because it opens up the floor, creating an illusion of space, while still offering drawer storage for your essentials. Look for medicine cabinets that do more than just provide a mirror; many modern designs include integrated lighting, electrical outlets, and ample hidden shelving. Even your toilet can be a storage opportunity with a slim, over-the-toilet cabinet. Choosing these hardworking fixtures is key to a successful small bathroom design.
Use Over-the-Door and Under-Sink Organizers
Once your main fixtures are in place, the final layer of organization comes from smart accessories. While not part of the construction, planning for them is crucial. An over-the-door rack can hold towels or robes without taking up any wall space. Inside your new vanity, pull-out trays and custom-fit drawer dividers can turn a potentially chaotic cabinet into a perfectly organized system. During our design process, we help you think through these details, ensuring your new bathroom isn’t just beautiful on day one but stays functional for years to come.
Choosing Tile and Materials to Make a Big Impact
The materials you choose for your floors, walls, and countertops are where your small bathroom’s personality really comes to life. The right tile, finish, and texture can make the room feel brighter, more open, and uniquely yours. While it’s easy to get overwhelmed by options, remember that in a compact space, every choice carries more weight. This is your chance to select finishes that truly make a statement. Seeing and touching materials is the best way to get a feel for how they’ll work together, which is why we guide every client through the selection process at our San Diego Design Center.
Large Format Tiles vs. Small Patterns
When it comes to tile, you can go in two very different directions to create a sense of space. Using large format tiles—think 12×24 inches or even bigger—results in fewer grout lines. This creates a clean, uninterrupted surface that makes the floor feel more expansive and less busy. On the other hand, smaller tiles, like a classic penny round or a detailed mosaic, can add texture and visual interest. Using a smaller tile pattern on the walls can actually draw the eye upward, making the ceiling feel higher. The key is to choose one direction and commit to it for a cohesive look.
Get a High-End Look on a Smaller Budget
One of the best parts of a small bathroom remodel is that it opens the door to using luxurious materials without a huge price tag. Because you’re working with less square footage, that slab of Calacatta marble or those handcrafted Zellige tiles you’ve been dreaming of might actually fit within your budget. This is the perfect opportunity to splurge on a high-impact feature, like a stunning countertop for your vanity or a beautiful accent wall in the shower. Investing in one or two premium materials can give the entire room a high-end feel that delivers incredible value for your bathroom remodeling project.
How Texture and Finish Affect the Room
Beyond color and pattern, the finish of your materials plays a huge role in how light behaves in the room. Surfaces with a bit of shine—like a glossy ceramic tile, polished chrome fixtures, or even a satin-finish paint—will reflect light and make the entire bathroom feel brighter and more airy. Matte finishes, in contrast, absorb light and create a softer, more modern look. Another simple but effective choice is opting for a frameless glass shower door instead of a shower curtain. It removes a major visual barrier, allowing your eye to see the entire space and making the room feel instantly larger.
Layout Changes That Make the Biggest Difference
Sometimes, the best way to create more space is to change the floor plan itself. While moving walls or plumbing is a bigger undertaking than swapping out a vanity, a thoughtful layout adjustment can completely transform how your bathroom feels and functions. A cramped, awkward space can become open, intuitive, and far more pleasant to use every day.
Working with an experienced design-build team is key when you’re considering these kinds of structural changes. We can help you see possibilities you might have missed and ensure every inch is used effectively. From reconfiguring the entryway to shifting fixtures for better flow, rethinking the layout is often the most impactful investment you can make in a small bathroom.
Rethink Your Door and Entryway
The classic swinging door is a notorious space-waster in a small bathroom. Every time you open it, it claims a significant chunk of your floor area, limiting where you can place fixtures or even stand comfortably. A simple solution is to install a pocket door that slides discreetly into the wall. This instantly frees up valuable real estate. If a pocket door isn’t feasible, consider a stylish barn door or simply re-hanging your current door to swing out into the hallway instead of into the bathroom.
Create Better Flow by Moving Fixtures
Changing the location of your toilet, sink, or shower is a major decision, as it often involves moving plumbing lines. While this adds to the project’s scope, the payoff in functionality can be enormous. Imagine your morning routine without bumping into the toilet or squeezing past the vanity. Placing a sink or a custom corner shower in an underutilized corner can open up the room’s central pathway. A well-planned bathroom remodel prioritizes flow, making sure the new layout serves your daily habits.
Establish Clear Sight Lines
Creating long, uninterrupted sight lines is a classic design trick to make any room feel larger. In a small bathroom, the biggest culprit for visual clutter is often the shower curtain or a bulky, framed shower door. Swapping it for a clear, frameless glass enclosure makes a world of difference. Your eye can travel all the way to the back wall, making the entire room feel more open and airy. You can see stunning examples of this in our featured projects, where clear glass helps small spaces feel expansive and modern.
DIY vs. Hiring a Pro: What’s Right for Your Project?
The satisfaction of a DIY project is undeniable. Painting a room or swapping out a light fixture can be a great weekend accomplishment. But a full bathroom remodel is a different beast entirely, especially in a small space where every inch counts. While you might save some money on labor upfront, the risks of tackling a project beyond your skill set can lead to costly mistakes, code violations, and a finished room that just doesn’t feel right.
A successful bathroom remodel is less about saving a few dollars and more about investing in lasting value, safety, and function. It requires a team of skilled tradespeople, a deep understanding of building codes, and a designer’s eye to pull it all together. Before you pick up that sledgehammer, it’s important to be honest about which parts of the job are truly DIY-friendly and which demand a professional touch. For most homeowners, that line is drawn at anything hiding behind the drywall.
Why Plumbing and Electrical Need an Expert
Of all the tasks in a bathroom remodel, plumbing and electrical work are the two areas you should never attempt on your own without a license. The biggest costs often come from updating these critical systems, and for good reason. A tiny, slow leak from a poorly sealed pipe can lead to thousands of dollars in water damage, mold, and structural repairs down the road. Faulty wiring isn’t just a code violation; it’s a serious fire hazard.
Licensed plumbers and electricians are trained to do this work safely and correctly the first time. They understand the specific requirements for things like GFCI outlets near water sources and proper venting for drain lines. Paying for their expertise isn’t just a line item in your budget—it’s an investment in your home’s safety and your own peace of mind.
Navigating San Diego Building Permits
Anytime you’re moving walls, changing your bathroom’s layout, or altering plumbing and electrical systems, you’ll need a permit from the city. Navigating the building permit process in San Diego can be complex and time-consuming, involving detailed plans, applications, and multiple inspections. Trying to manage this on your own can easily stall your project for weeks or even months.
This is where working with an experienced design-build firm becomes a huge advantage. A team that handles remodels in San Diego every day knows exactly what the city requires. They manage the entire permitting process for you, ensuring all work is up to code and passes inspection. Following a clear remodeling process that includes professional permit management helps avoid hidden costs and keeps your project on a predictable timeline.
When Professional Design Is Worth It
In a small bathroom, good design isn’t a luxury—it’s essential. An experienced designer can find clever ways to make a compact space feel open, functional, and beautiful. They know how to choose a vanity that offers storage without feeling bulky, select tile that creates an illusion of space, and design a lighting plan that makes the room feel bright and airy. These are the smart choices that transform a cramped bathroom into a personal retreat.
Working with a professional gives you a cohesive plan before any work begins. At our San Diego showroom, you can collaborate with our designers to see and touch materials, ensuring every element works together perfectly. This guidance helps you maximize your budget and create a space that not only looks great but also functions flawlessly for your daily routine.
Planning Your Remodel: A Step-by-Step Timeline
A bathroom remodel is an exciting process, but it’s also a complex one with many moving parts. Understanding the sequence of events can make the entire experience feel much more manageable and predictable. From the first design sketch to the final walkthrough, having a clear roadmap helps you know what’s happening, when it’s happening, and what you need to do to prepare. A well-planned project ensures a smoother journey and a final result you’ll love for years to come. At King Remodeling, we follow a structured, transparent path to keep your project on track and your stress levels low.
What to Expect: Project Phases and Duration
A full bathroom remodel isn’t a weekend project. The timeline can vary significantly based on the scope, permit requirements, and material availability. A typical project includes an initial design phase, material selection at our San Diego showroom, permitting, and the construction itself, which can take several weeks. For extensive projects, especially those that uncover unexpected issues like old plumbing or mold, the entire process from initial concept to completion can take a few months. We map out a detailed schedule from the start, so you have a clear understanding of each phase and can plan accordingly for the transformation of your space.
How to Prepare Your Home for Construction
Once the start date is set, a little prep work goes a long way in making construction smoother for everyone. Before the crew arrives, clear out all personal items from the bathroom, including towels, toiletries, and decor. It’s also wise to create a clear path from the entrance of your home to the bathroom to protect your floors and furniture. If you’re dealing with an insurance claim for water damage, take time to research the true replacement cost of your fixtures and finishes. This ensures you can advocate for yourself and get the funds you need for a quality restoration.
Partnering with Your Design-Build Team
Choosing the right team is the single most important decision you’ll make. You’re not just hiring a contractor; you’re inviting a partner into your home. Look for a team that communicates clearly, respects your space, and genuinely has your back throughout the process. A great design-build firm acts as your single point of contact, managing everything from design and materials to the build itself. This integrated approach, which is central to our process, eliminates the stress of juggling multiple vendors and ensures everyone is working toward the same goal: creating a beautiful, functional bathroom you love.
Related Articles
- 36 Very Small Bathroom Ideas to Maximize Space
- 15+ Small Bathroom Layout Ideas for More Space
- 15 Small Bathroom Remodel Ideas for More Space
- Small Modern Bathroom Ideas: The Ultimate Guide
- Cost to Remodel a Small Bathroom: A 2025 Guide
Frequently Asked Questions
I have a small bathroom and a limited budget. Where should I focus my money to get the most impact? To get the most significant change, focus on the elements that affect both function and visual space. Swapping a bulky, floor-mounted vanity for a floating one and replacing a shower curtain with a frameless glass door can completely transform the room. These two changes open up sight lines and make the floor appear larger. Another smart investment is a great lighting plan; layering different light sources can make even a windowless bathroom feel bright and welcoming.
How long will my bathroom actually be unusable during the remodel? The active construction phase, where your bathroom is out of commission, typically lasts for several weeks. The exact duration depends on the scope of your project, like whether we’re moving plumbing or waiting on custom materials to arrive. The good news is that a lot of work happens before demolition begins, including the design phase, material selection, and permitting. We provide a detailed project schedule upfront so you know exactly what to expect and can plan accordingly.
There are so many design options. How do I figure out my style and make sure everything looks good together? It’s completely normal to feel a bit overwhelmed by all the choices. A great starting point is to gather inspiration—save photos of bathrooms you love and try to identify what they have in common. Is it the color palette, the tile pattern, or the clean lines? This gives us a foundation to build on. Our design process is built to help with this. We guide you through selections at our showroom, where you can see and touch materials, helping you create a cohesive plan that reflects your personal style. Explore get your bathroom remodel quote for more details.
What does “design-build” actually mean for my project? How is it different from hiring a separate designer and contractor? Think of design-build as having one team and one point of contact for your entire project, from the first sketch to the final coat of paint. Instead of you having to manage a designer, a contractor, and various suppliers, we handle all of it. This integrated approach means the design is created with your budget and construction realities in mind from day one. It leads to clearer communication, fewer surprises, and a much smoother process for you as the homeowner.
I’m ready to explore my options. What’s the first step to getting a realistic quote for my project? The best first step is to schedule a consultation with our team. This allows us to see your space, listen to your goals, and understand what you want to achieve with your remodel. From there, we can discuss realistic budget ranges and outline the next steps in our design and planning process. It’s a no-pressure conversation focused on giving you the clarity you need to move forward confidently.
Small Bathroom Remodeling Near You in San Diego
Ready to transform your small bathroom? King Remodeling provides expert bathroom renovation services throughout San Diego County: